Tutorial Tuesday: Recoloring Elements
Sometimes you get to scrapping a page, and halfway into your fabulous creation, you want an element in a certain place – but you can’t find one in the color that you want. So, what do you do? Recolor! There are several different ways to recolor in Photoshop, and I’m going to show you two methods that I use all.the.time.
Method One

Create a new layer above your element and fill it with the color you want to change it to

Change the blend mode of the color layer to “color”

Simple stuff, right?
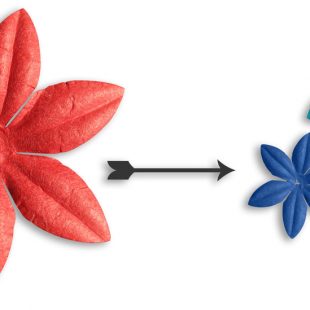
By leaving the color layer unclipped above the element, I can see what the element will look like and if I need to make adjustments I can without any hassle.
The flower is a little darker blue than I want it here:

To fix this, click on your original element layer then go to Image > Adjustments > Brightness/Contrast

Here I’ve bumped the brightness up a little bit on the flower so that it better matches the blue

Now you can clip the color layer to your element and save as a new, recolored, element

Sometimes, you have to go a little bit further. This yellow flower is way too light to use the Brightness/Contrast adjustment by itself:

In this case, I’m going to desaturate the flower first….


Then I can use the Brightness/Contrast adjustment. Not only have I lowered the brightness here, I’ve bumped up the contrast a little bit to sharpen the detail of the flower:

Clip the color layer to your element and save as a new element 
Method Two
This method is slightly more involved but if using a color layer doesn’t work, this method most likely will.
Duplicate your element

Add a new layer in between the copies and fill with the color you want your element to be

Click on the top copy of your element to select it and then go to Image > Adjustments > Desaturate

Change the blend mode of your desaturated copy. Here’s where it gets a bit tricky…
I usually start with Linear Light:

Turns out, on this element, it’s a bit too much:

If linear light mode doesn’t do it, I try Overlay next:

This looks better color-wise, but it’s a bit too light & the texture is washed out, so I adjust the brightness and contrast:

Now the color is spot on, but the texture of the flower needs help.
Duplicate the top copy of your element:

This turned out perfectly. Sometimes I need to change the Overlay blend to Soft Light instead, because Overlay gives it too much pop. It just depends on what you’re working with, so play with the blend modes until your satisfied with the results. Then you can clip all the top layers to your original element and save as a new element:

SO – that’s all well and good, but what if my flower has a center?
This is one of the flowers from Life Is Short…Eat Dessert First! {Full Kit}

Using a color layer, I can change it to purple, but this also changes the flower’s center to purple as well:

I can make a new color layer and use a hard round brush to “color in” the center


Or, I can use another element from the kit I’m using to ‘cover it up’

Pretty cool stuff, right? By recoloring elements (and even papers!) in your stash you can stretch your stash even further! There are a few other ways to recolor things, but I found these 2 methods to be the easiest and the fastest. How do you recolor elements?
Comments are closed.